| 일 | 월 | 화 | 수 | 목 | 금 | 토 |
|---|---|---|---|---|---|---|
| 1 | 2 | 3 | 4 | 5 | 6 | 7 |
| 8 | 9 | 10 | 11 | 12 | 13 | 14 |
| 15 | 16 | 17 | 18 | 19 | 20 | 21 |
| 22 | 23 | 24 | 25 | 26 | 27 | 28 |
- 파이썬
- docker
- python최단거리
- 패치분할
- Python
- 3d
- GCN
- geojson
- 좌표거리
- GIS
- pyvista
- 동명이인찾기
- 폴더조사
- 이미지빌드
- graph
- 데이터입수
- 도커 레이어
- 그리드분할
- Set
- 알고리즘
- MESH
- 도커
- 귀여운고래
- 컨테이너
- geopandas
- 3d데이터
- osmnx
- 지하철역좌표
- GNN
- STL
- Today
- Total
이것저것 기록
[python, GIS] 여러 개의 .shp파일을 .png로 시각화하기 본문
1. 사실 아무도 안 쓸 것 같은데 왜 포스팅 하나요?
이 포스팅은, 사실 얼마나 많은 사람들이 필요로 하는 코드일지는 잘 모르겠다.
다만 내가 속한 연구실에서 하던 프로젝트를 위해 짰던 코드인데, 꽤나 고생을 해서 이렇게라도 기록을 남기고 싶어서 포스트로 만들기로 결정했다.
내가 맡은 프로젝트는 건물동 별로 벽, 창문, 문, 엘리베이터, 방, 계단 등 다양한 형태의 건축 요소가 .shp파일의 결과물로 떨어지게 돼 있다.
그런데 이 결과물이 잘 뽑혔는지, 어쩐지 확인하려면 일일이 QGIS를 열어서 해당 .shp파일을 드롭한 다음에 확인해야 했기 때문에 이 프로세스가 꽤나 복잡하고 귀찮았다.
결과를 수없이 여러 번 확인하고, 코드를 수정하고, 또 결과를 확인하고, 코드를 수정해야하는데,
결과를 확인할 때마다 일일이 QGIS를 열어서 확인하는게 귀찮아서 자동화 코드를 만들게 된 것이다.
특정 함수만 톡 떼어서 포스팅하기가 좀 애매해서, 전체 코드와 함께 샘플 데이터도 업로드 해야할 것 같다.
아무래도 이 코드에 딱 맞는 인풋, 아웃풋을 가지고 있는 사람이 얼마 없을 것 같다보니...
zip파일 안에는 57-3폴더, png폴더, 57-3.png, 그리고 코드가 들어있다.
57-3폴더에는 폴리곤.shp파일이 들어있는 폴더와 라인.shp파일이 들어있는 폴더가 있고,
png폴더는 결과 이미지가 생성되는 폴더이다.
2. 필요한 라이브러리 불러오기
from shapely.geometry import Polygon
from shapely.wkb import loads
from osgeo import ogr
from matplotlib import pyplot
import os
import cv2
3. drawPolygon
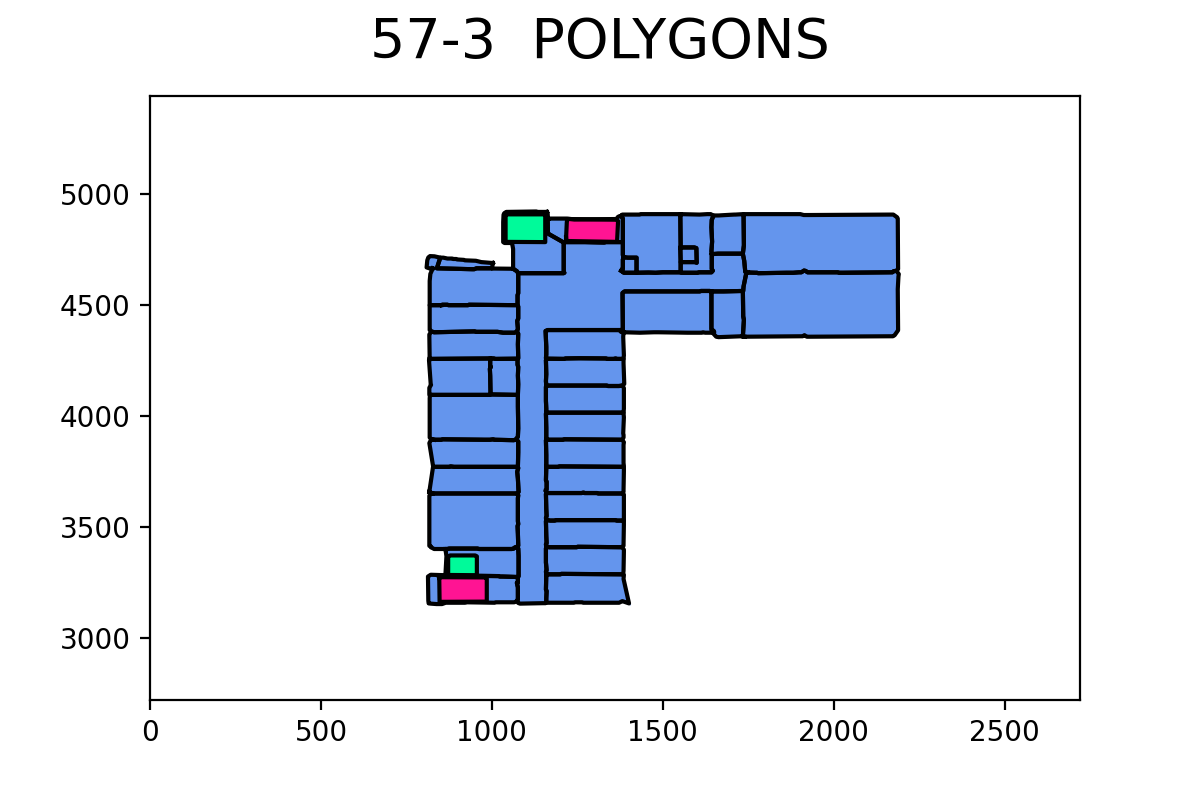
def drawPolygon(polygon, graf, fill_color, plot_color):
    if polygon.type == 'MultiPolygon':
        return None
    xLista, yLista = polygon.exterior.xy
    graf.fill(xLista, yLista, "y", color = fill_color)
    graf.plot(xLista, yLista, "k-", color = plot_color)
이 함수는 폴리곤.shp파일을 하나씩 불러와서 plot하는 함수이다.
4. drawLine
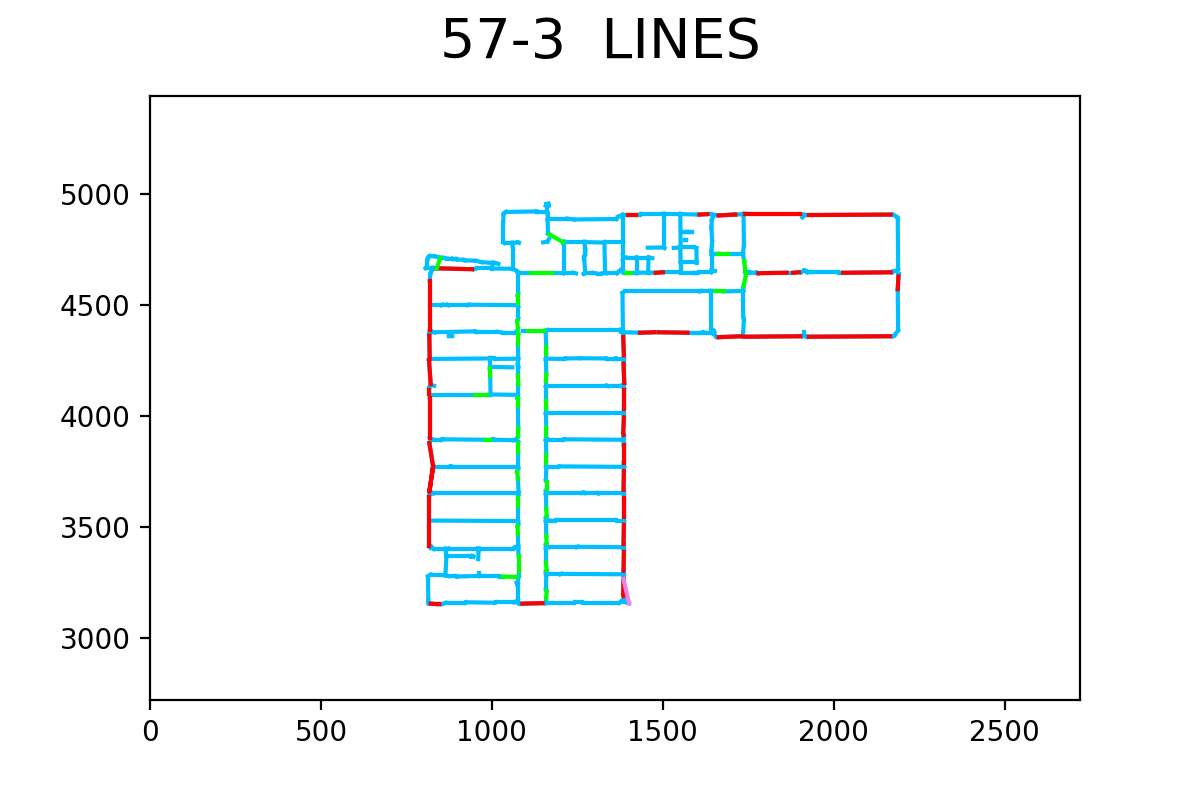
def drawLine(line, graf, plot_color):
    xLista, yLista = line.coords.xy
    graf.plot(xLista, yLista, "k-", color = plot_color)
이 함수는 라인.shp파일을 하나씩 불러와서 plot하는 함수이다.
5. 메인 코드
fpnumber = '57-3'
poly_dir = 'C:/Users/user/Desktop/sample/' + fpnumber + '/polygonize/'
vec_dir = 'C:/Users/user/Desktop/sample/' + fpnumber + '/vector_output/'
img_path = 'C:/Users/user/Desktop/sample/png/'
original_img = 'C:/Users/user/Desktop/sample/'


os.chdir(original_img)
img = cv2.imread(fpnumber + '.png')
height = img.shape[0]
width = img.shape[1]

fig1 = pyplot.figure(dpi=200)
fig2 = pyplot.figure(dpi=200)
# fig3 = pyplot.figure(dpi=200)

ax = fig1.add_subplot(111) #세로1개, 가로1개에 첫번째
ab = fig2.add_subplot(111) #세로1개, 가로1개에 첫번째
# ac = fig3.add_subplot(111)

ax.set_xlim([0, width])
ax.set_ylim([height, height * 2])
ab.set_xlim([0, width])
ab.set_ylim([height, height * 2])
# # ac.set_xlim([0, 3309])
# # ac.set_ylim([0, 3309])


stair_parcel = None
lift_parcel = None

poly_files = os.listdir(poly_dir)
os.chdir(poly_dir)
for file in poly_files:
    rm_polys = ogr.Open(fpnumber + '_new_polys.shp')
    rm_layer = rm_polys.GetLayerByName(fpnumber + '_new_polys')
    rm_parcel = rm_layer.GetNextFeature()

    if 'stair' in file:
        stair_polys = ogr.Open(fpnumber + '_stair_polygons.shp')
        stair_layer = stair_polys.GetLayerByName(fpnumber + '_stair_polygons')
        stair_parcel = stair_layer.GetNextFeature()

    if 'lift' in file:
        lift_polys = ogr.Open(fpnumber + '_lift_polygons.shp')
        lift_layer = lift_polys.GetLayerByName(fpnumber + '_lift_polygons')
        lift_parcel = lift_layer.GetNextFeature()


vec_files = os.listdir(vec_dir)
os.chdir(vec_dir)

xy_parcel = None
conn1_parcel = None

for file in vec_files:
    wall_vecs = ogr.Open(fpnumber + '_wall.shp')
    wall_layer = wall_vecs.GetLayerByName(fpnumber + '_wall')
    wall_parcel = wall_layer.GetNextFeature()

    if 'window' in file:
        win_vecs = ogr.Open(fpnumber + '_window_line.shp')
        window_layer = win_vecs.GetLayerByName(fpnumber + '_window_line')
        window_parcel = window_layer.GetNextFeature()

    if 'door' in file:
        door_vecs = ogr.Open(fpnumber + '_door_line.shp')
        door_layer = door_vecs.GetLayerByName(fpnumber + '_door_line')
        door_parcel = door_layer.GetNextFeature()

    if 'xy_line' in file:
        xy_vecs = ogr.Open(fpnumber + '_xy_line.shp')
        xy_layer = xy_vecs.GetLayerByName(fpnumber + '_xy_line')
        xy_parcel = xy_layer.GetNextFeature()

    if 'conn1' in file:
        conn1_vecs = ogr.Open(fpnumber + '_conn1.shp')
        conn1_layer = conn1_vecs.GetLayerByName(fpnumber + '_conn1')
        conn1_parcel = conn1_layer.GetNextFeature()


## polygon
while rm_parcel is not None:
    geometryParcel = loads(rm_parcel.GetGeometryRef().ExportToWkb())
    drawPolygon(geometryParcel, ax, 'cornflowerblue', 'k')
    rm_parcel = rm_layer.GetNextFeature()


while stair_parcel is not None:
    stair_geometryParcel = loads(stair_parcel.GetGeometryRef().ExportToWkb())
    drawPolygon(stair_geometryParcel, ax, 'deeppink', 'k')
    stair_parcel = stair_layer.GetNextFeature()

while lift_parcel is not None:
    lift_geometryParcel = loads(lift_parcel.GetGeometryRef().ExportToWkb())
    drawPolygon(lift_geometryParcel, ax, 'mediumspringgreen', 'k')
    lift_parcel = lift_layer.GetNextFeature()

os.chdir(img_path)
fig1.suptitle(fpnumber + '  POLYGONS', fontsize = 20)
fig1.savefig(fpnumber + '_polygons.png')


## line
# 1) wall
while wall_parcel is not None:
    geometryParcel = loads(wall_parcel.GetGeometryRef().ExportToWkb())
    drawLine(geometryParcel, ab, 'deepskyblue')
    wall_parcel = wall_layer.GetNextFeature()

# 2) window
while window_parcel is not None:
    geometryParcel = loads(window_parcel.GetGeometryRef().ExportToWkb())
    drawLine(geometryParcel, ab, 'r')
    window_parcel = window_layer.GetNextFeature()

# 3) door
while door_parcel is not None:
    geometryParcel = loads(door_parcel.GetGeometryRef().ExportToWkb())
    drawLine(geometryParcel, ab, 'lime')
    door_parcel = door_layer.GetNextFeature()

# 4) xy
while xy_parcel is not None:
    geometryParcel = loads(xy_parcel.GetGeometryRef().ExportToWkb())
    drawLine(geometryParcel, ab, 'orange')
    xy_parcel = xy_layer.GetNextFeature()

# 5) conn1
while conn1_parcel is not None:
    geometryParcel = loads(conn1_parcel.GetGeometryRef().ExportToWkb())
    drawLine(geometryParcel, ab, 'violet')
    conn1_parcel = conn1_layer.GetNextFeature()


os.chdir(img_path)
fig2.suptitle(fpnumber + '  LINES', fontsize = 20)
fig2.savefig(fpnumber + '_lines.png')
코드가 엄청 길고 복잡해보이지만 사실은 벽, 창문, 문 등 불러오는 객체가 많아서 그런거고
모두 동일한 프로세스를 거친다.
xx_layer에 폴리곤/라인을 불러오고,
.GetNexFeature()을 사용해서 xx_parcel에 불러온 각각의 레이어를 차곡차곡 넣어준다.
그리고 쌓아준 레이어를 위에서 정의한 함수로 plot해주는 것뿐이다.
6. 실행 결과


복잡하지 않다고는 했지만.. 노가다로 결과 확인하는 게 귀찮아서 만든 코드치고는
꽤나 애먹으면서 만든 코드긴 하다.
어떻게 보면 자료가 저장되는 형태를 바꾼 것인데, 그게 꽤 어려웠다.
어디까지나 기록으로 남길 포스팅이긴 하지만 나한테는 이 코드가 상당히 의미가 있다.
한두시간이면 끝날 것 같았던 task인데 반나절이 넘게 걸렸던 걸로 기억하는데, 중간에
'아 그냥 노가다로 때울까' 싶은 마음이 몇 번 들긴 했지만 끝까지 이 자동화 코드를 만들어내서 뿌듯했었다.
RUN을 누르고 이미지 폴더에 .shp결과가 .png로 따다다다닫 떨궈지는 쾌감이란 ㅠㅠ
'코린이 > 실무를 위한 코딩 기록' 카테고리의 다른 글
| [python, graph] 그래프 관련 파이썬 라이브러리 소개 및 추천 (geo2dr, karateclub) (0) | 2021.01.10 |
|---|---|
| [python, GIS] 카카오 지도 API 를 사용해서 도로명주소 및 행정구역코드 추출 (10) | 2020.12.30 |
| [python, GIS] OSMnx로 POI 데이터 추출 및 활용 (1) | 2020.12.16 |
| [python, GIS] geopy로 주소 간단하게 지오코딩 하는 방법 (5) | 2020.12.09 |
| [python] NetworkX로 넷플릭스 유사 영화 추천 알고리즘 구현 (0) | 2020.12.09 |


